Light as tool in Shanghai
Thank you China & Shanghai – 感谢大家
I had great opportunity last August to travel China and do couple of Dedolight lighting seminars there.
Check what happened in Shanghai!
Light as tool – Soft light
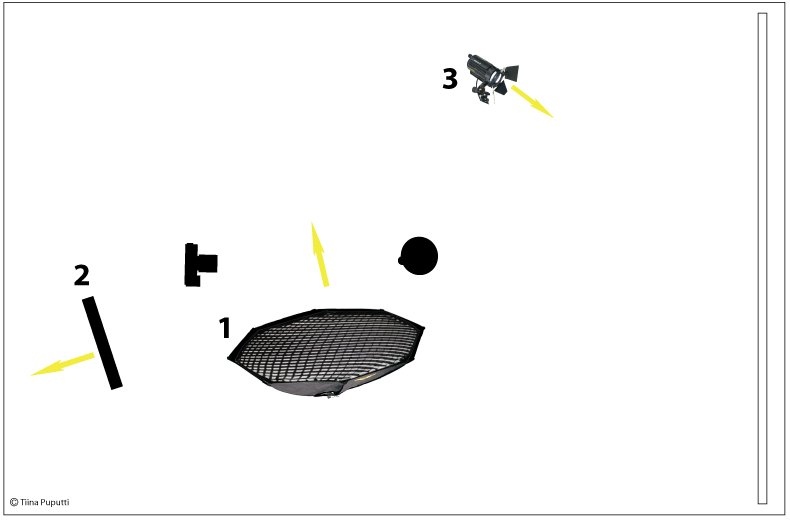
Lighting equipment
(1) Main light: Dedolight Panaura 5 + grid
(2) Fill light: Dedolight DLEDRAMA
(3) Background light: Dedolight DLED 7 + barn doors
(4) Rim light: Aladdin BI-FLEX 1 (30x30cm) attached to Aladdin BI-FLEX 2 (30x56cm)
(5) Hair light: Aladdin BI-FLEX 2 (30x56cm)

Light as tool – Hard light

Lighting equipment
(1) Main light: Dedolight DLED 7 + barn doors
(2) Fill light: Dedolight DLEDRAMA
(3) Rim light: Aladdin BI-FLEX 4 (30x108cm)
(4) Rim light: Aladdin BI-FLEX 1 (30x30cm) attached to Aladdin BI-FLEX 2 (30x56cm)
(5) Additional light source: Dedolight DLED 7 + barn doors (to lit front of model)
(6) Additional light source: Dedolight DLED 7 + barn doors (to lit decorations on model’s hair)
(3) Background light: Dedolight DLED 7 + projection attachment + gobo

To be continued, next: Lighting seminar in Beijing!
Light as tool in Beijing
Thank you China & Beijing – 感谢大家
I had great opportunity last August to travel China and do couple of Dedolight lighting seminars there.
Check what happened in Beijing!
Light as tool – Soft light

Lighting equipment
(1) Main light: DLED 9 + barn doors + white, translucent diffuser
(2) Fill light: Dedolight DLEDRAMA
(3) Rim light: Aladdin BI-FLEX 1 (30x30cm) attached to Aladdin BI-FLEX 2 (30x56cm)
(4) Rim light: Aladdin BI-FLEX 2 (30x56cm)
(5) Fill light/reflector: white card board
(6) Background light: Dedolight DLED 7 + projection attachment + gobo

Light as tool – Hard light
Lighting equipment
(1) Main light: Dedolight DLED 7 + barn doors
(2) Fill light: Dedolight DLEDRAMA
(3) Rim light: Dedolight DLED 7 + barn doors
(4) Additional light source: Dedolight DLED 7 + barn doors (to lit front of model)
(5) Additional light source: Dedolight DLED 7 + barn doors (to lit front of model)
(6) Background light: Dedolight DLED 7+ barn doors


See your light – continuous light sources in portraiture

Last Saturday I had photography workshop in cooperation with Audico Systems. Theme of the workshop was how to use continuous light sources in portraiture.
I find as main advantage of continuous light sources that you can see light all the time you're shooting. So what you see through viewfinder will be same in final image.
To be able to see light all the time you're shooting makes it easier if you compare it to use of flash. But it's not that simple.
Whether you use flash or continuous light sources you still need to understand about light and lighting. I think you need to understand f.e. how to place and point light sources in relation to subject, how to to decide brightness of light sources (f.e. main light, kicker...), how to control contrast – all these basics of lighting which every photographer has to take care apart from which light sources he/she uses.
And of course you need to understand about rhythm of light and shadow. My favorite subject :D
Among technical points of view I wanted to demonstrate to participants also about visual and storytelling points when you're shooting people:
- differences in methodology: how to shoot people in stable lighting condition (studio) or in location with natural or available light --> in studio photographer builds all lighting and he/she can control it too
- genre of portrait: commercial, fine art, documentary, personal portrait..
- visualization: person and props which is linked to person or only person, light and shadow
- how to guide models in shooting situation
- how to place model: poses, expressions that support message of image
Large light sources & soft light, small light sources & hard light
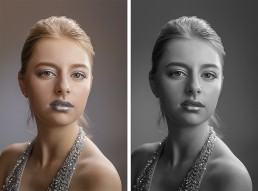
In first shooting demonstration I created classic and timeless lighting with soft light. I think everyone who does portraiture should handle this basic lighting.
And it's easy to start practice; just find nearest window – you'll get this classic lighting in front of every window. You just have to see it :)
I find it important because it's basic for all people photography. It's about "seeing light" and create rhythm of light and shadow to image; one rule of thumb which you can later on use wherever you shoot people, whether it's studio or location.
As main light (1) I used Dedolight Panaura 5 which is a large soft box.
It produces soft light and even though it's diameter is over 1m it creates 3-dimensionality to model's face. In this case there were three layers of translucent diffuser between light source and model. And grid which direct light beam.
As fill light (2) I used Dedolight DLEDRAMA-BI.
It was pointing towards walls and ceiling behind camera (about 45 degree angle). This way it circulates via walls and ceiling, and light becomes softer. At the same time it's "general lighting" which make studio a bit lighter.
As background light (3) I used small Dedolight Tungsten 100 Series -light source.
It has spot and flood position (light beam) and with that feature you can create round gradation in background.