I had great team with me while we’re doing POSE – Guidance of the Model Photography guidebook. We agreed a while ago that we’ll have get-together when POSE is published and celebrate that. And how we did it – with photo shoot 🙂 Idea for this came because Tanja is shooting photo series of ladies in different decades.

Lighting diagram for Hollywood Glamour Portrait
(1) Main light: Dedolight Classic 150W tungsten halogen spot + barn doors
(2a) Fill light: 1 000w halogen spot and (2b) glossy silver-gold -reflector, appr. 1 x 2 m
(3) Rim lights: 4 Dedolight Classic 150W tungsten halogen spots + barn doors
(4) Additional light source: Dedolight Classic 150W tungsten halogen spot + barn doors
(5) Additional light source: Dedolight DLED 4.1 led light head + barn doors
(6) Additional light source: Dedolight DLED 4.1 led light head + barn doors
(7) Additional light source: Dedolight Ledzilla 2 led light head + barn doors
In 30’s Hollywood Glamour style is typical that lighting is done with small light sources; it’s high contrast, cookie lighting is used and edge of lights and shadows are hard. That’s why we chose to use small-size Dedolight halogen spots to create this image.
Poses in Hollywood Glamour images are usually static because in that time exposures were longer and model has to stay longer on pose. That’s why models are typically placed that she/he could lean on something. So Tanja painted one of her garden chairs golden an it fitted perfectly to Glamour Style. With help of chair I was able to be more static and also able to exaggerate my pose. Exaggerated poses are also typical for Hollywood Glamour style. Whole photo shoot we used live view on laptop’s screen so I could see image and assist Tanja in lighting.
In portraiture model’s expression is typically the most important and face is lit the most contrast and brightest part of image. That’s why she began lighting with main light (1). This way it’s easier to add other light sources later and proportion they to main light’s brightness. Even though Dedolights are small light sources it’s good to attach barn doors to them. Especially when you want create cookie lighting – barn door narrows light beam and you can create cookie lighting with multiple light sources (and if you have less light sources are gobos and cookies solution).
After main light Tanja placed rim lights (3) behind me. Because image cropping is full length she needed two light sources in both sides. Otherwise she wound’t have got light rim all the way from head to toes. Because expression is important, those rim lights which lit upper body were brighter and lower ones. All rim lights were placed that they didn’t point out straight to model. They were placed that hot spots points out past model (check directions of yellow arrows on lighting diagram). This way light shows subject’s form and it doesn’t just create hot spots and burnt areas. Idea of rim lights is to separate model from background with different tone values (difference should be big enough). Tanja decided to leave background all black, so she really needed rim lights for separate model all the way down to toes.
And then to low key lighting… Tanja added fill light (2) behind camera. 1000w halogen spots pointed out to glossy silver-gold reflector. Color of reflector created warmish tone to model’s skin in shadow parts. With fill light shadow parts of face and cleavage appeared light enough but dress stayed still too dark. If you want to have shape and structure to black dress you have to lit it more, and that’s low key lighting (these additional light sources should’t hit face or other lighter areas). To get structure and form to dress Tanja placed one additional light source (4) on right side of me, appr. 45 degree angle (up and side). In this case one additional light source wasn’t enough to lit all dress all the way down.
At this point we ran out Dedolight halogen spots but luckily we still had two DLEDs (tungsten and bi-color) which she used to lit dress all the way. She added those additional light sources (5&6) same side of me than first one (4), but more on the side that light hit and spread more to shadow side of dress. As you notice, every light source are same side of model: this way final image appears that it’s been lit only one light source. Now dress was done – and still there was chair. Luckily we still got one more additional light source (7): Ledzilla 2 – that Tanja used to lit chair. And then it was time to shoot – and for me imaging to be Coco Chanel or Ingrid Bergman. And for Tanja – first ever low key and first ever photo shoot with Dedolights. And for Alina and Pihla – first ever 30’s hair style with curvy waves.
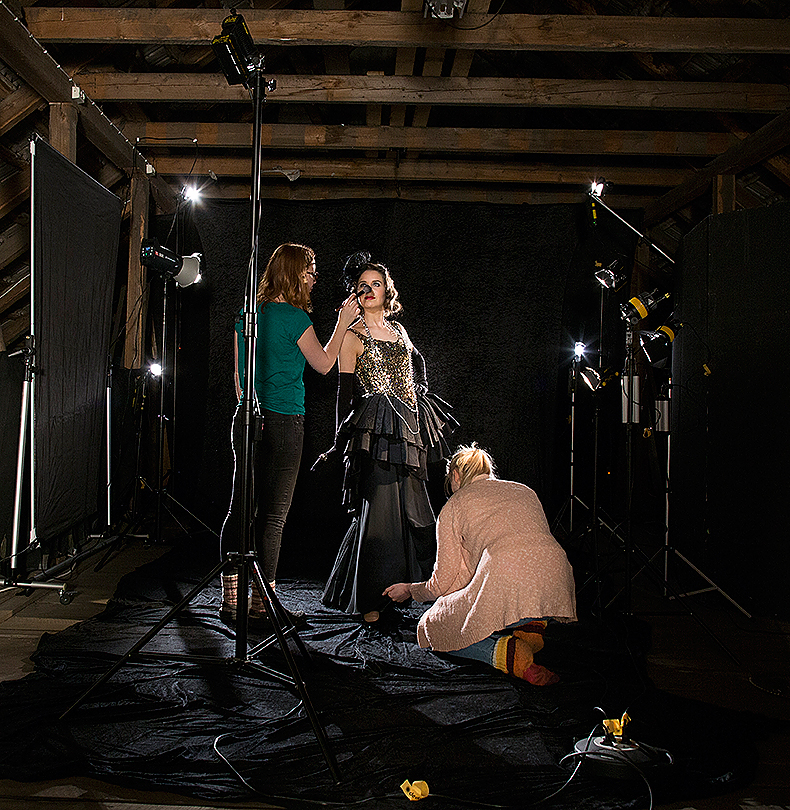
This behind the scenes image show lighting in real. There’s still light source for background but that Tanja left out from final image. Alina and Pihla are fixing make-up and dress. And after all photo shoots for POSE, how easy this time was for me 🙂 And very different. They say that all photographers should be models sometime to understand how model feels while photo shoot. So try it!
And about get-together… we’ve done, achieve and experience a lot together. Tanja, Alina and Pihla were with me in all photo shoots for my previous book. They were responsible for make-ups and assisting. So what can you say – you have special place in my heart <3